This is a Photoshop tutorial showing you all the steps you need to take in order to photo-manipulate yourself into an Avatar (based on the characters in James Cameron's movie "Avatar"). I used Photoshop CS5 in order to create this, but older versions should do the same just with a few different steps.
Step 1
Import a photograph of your choice, but make sure its size is relatively large, as it gives more room to play with. Also, make sure that the person on the photograph is well lit - but not over lit - perhaps taken with a flash, so that enough sharp details are visible. If necessary then change the levels of the photo before any other step to make sure you can see the features of the face.
Step 2
My overall image had turned a little too dark in my opinion, so I went to my Layers window, and at the bottom I clicked on the "black and white" symbol that has the name "Create new fill or adjustment layer", and selected "Levels..." from the menu. Now a new window opens up and all I did was click on "Auto" and "OK". However that option doesn't always turn out a good image, so you may want to play around with the sliders. Alternatively, if your image is too light or pale, you can change this here too, using the sliders.
Step 3
Liquify the nose to achieve the broad nose. Use varied sizes when liquefying. If you haven’t used this before play around with it until you get the nose you want. The avatars have a broad catlike nose and defined features unique to the individual. Enhance your own features here. Adjusting the mouth slightly will help balance the other larger features.
Step 4
Create a new adjustment layer. Double click the gradient map enter the following colors into the different boxes:
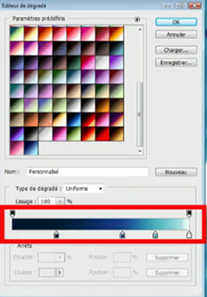
However, every photograph is different, so you may prefer different shades of blue for your image. And finally, pick a shade of purple, I used #472a50, with a small brush and its Opacity set to 10%, paint the lips with it, and then randomly brush all over the face with it, as this breaks everything up a bit, thus making it more "natural" looking.
Step 5
Create a new layer. Use the elliptical marquee tool and paint with a soft round brush. I used the color #73712e, width: 20px and opacity: 100%. On the same layer use the elliptical marquee tool. Paint with a soft round brush color #000000, width: 20px and opacity: 100%. Create a new layer and paint some lines with a soft round brush. Color #c12b648, width: 9px, opacity: 100%. Use the smudge tool width: 9px, strength: 50% and smudge the lines you just made. Create a new layer and paint with a soft round brush and use a darker green color #545b34, width: 9px, opacity: 100% around the outer part of the eye as well as dark lines in the color part of the eye. Use the smudge tool width: 9px, strength: 50% and smudge the lines you just made. Smudge where the green meets the black part of the eye so there is not a sharp edge. Use the dodge and burn tool to create to your liking the high lights and low lights in the eyes. Next create a new layer and paint with a soft round brush use the color white #000000 a width of9px and opacity 50%. Use the smudge tool to soften the edge. This is to give a glossy look to the eyes.
Step 6
After you done to your liking merge all of the eye layers and duplicate this layer. Use the horizontal flip to make the other eye.
Step 7
Create a new layer and paint the lines around the face with a soft round brush. Color #002542 width 20px and opacity 100%. Apply a gaussian blur of 5px. Change the opacity of the layer to 25%. Change the layer blending mode to vivid light.
Step 8
Next take the dodge and burn tool and create highlight and lowlights on the cheek bones and forehead.
Step 9
On a new layer paint with a soft round brush and paint on the white dotes on to the cheeks, nose, forehead, and chin.. Color white #000000 width: 9px and opacity 100%. Change the layer blending mode to overlay. Duplicate this layer and apply a Gaussian blur 5px. Use the eraser to adjust the light on these layers width 40px and opacity 30%.
Step 10
This is still fairly difficult. You will now be using the "Burn" and "Dodge" tools from the Tools window a lot. Use both tools, with their "Range" set to "Midtones", and the "Exposure" set to 5% and continue to "shape" the nose by carefully adding definition. "Burn" darkens, while "Dodge" highlights, so make sure you figure out where the light on your picture is coming from. Because this step is so tricky, it is okay to carry on with the next steps and return to the nose from time to time. I continued to use the "Burn" tool - a combination of both "Midtones" and "Shadows", to further add definition all around the face. You may choose not to do this on your photograph. However, you might have noticed that I went back to "Liquify" the nose a little more....
Step 11
Now here is the final result with the original image:
![]()